Describe
Overview
The describe tool scans the PR code changes, and generates a description for the PR - title, type, summary, walkthrough and labels.
The tool can be triggered automatically every time a new PR is opened, or it can be invoked manually by commenting on any PR:
Example usage
Manual triggering
Invoke the tool manually by commenting /describe on any PR:

After ~30 seconds, the tool will generate a description for the PR:

If you want to edit configurations, add the relevant ones to the command:
Automatic triggering
To run the describe automatically when a PR is opened, define in a configuration file:
- The
pr_commandslists commands that will be executed automatically when a PR is opened. - The
[pr_description]section contains the configurations for thedescribetool you want to edit (if any).
Configuration options
Possible configurations
| publish_labels | If set to true, the tool will publish the labels to the PR. Default is true. |
| publish_description_as_comment | If set to true, the tool will publish the description as a comment to the PR. If false, it will overwrite the original description. Default is false. |
| publish_description_as_comment_persistent | If set to true and `publish_description_as_comment` is true, the tool will publish the description as a persistent comment to the PR. Default is true. |
| add_original_user_description | If set to true, the tool will add the original user description to the generated description. Default is true. |
| generate_ai_title | If set to true, the tool will also generate an AI title for the PR. Default is false. |
| extra_instructions | Optional extra instructions to the tool. For example: "focus on the changes in the file X. Ignore change in ..." |
| enable_pr_type | If set to false, it will not show the `PR type` as a text value in the description content. Default is true. |
| final_update_message | If set to true, it will add a comment message [`PR Description updated to latest commit...`](https://github.com/Codium-ai/pr-agent/pull/499#issuecomment-1837412176) after finishing calling `/describe`. Default is true. |
| enable_semantic_files_types | If set to true, "Changes walkthrough" section will be generated. Default is true. |
| collapsible_file_list | If set to true, the file list in the "Changes walkthrough" section will be collapsible. If set to "adaptive", the file list will be collapsible only if there are more than 8 files. Default is "adaptive". |
| enable_help_text | If set to true, the tool will display a help text in the comment. Default is false. |
Inline file summary 💎
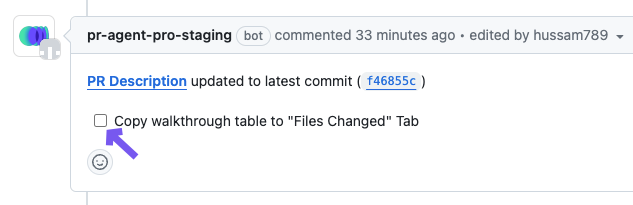
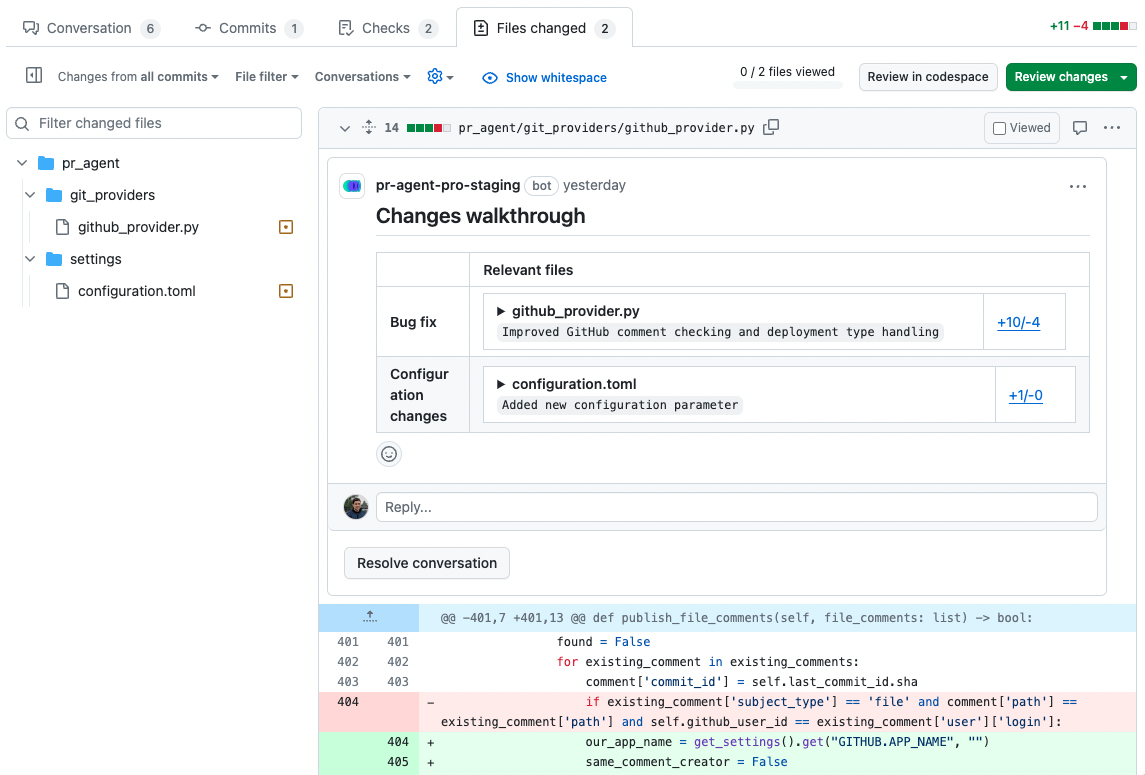
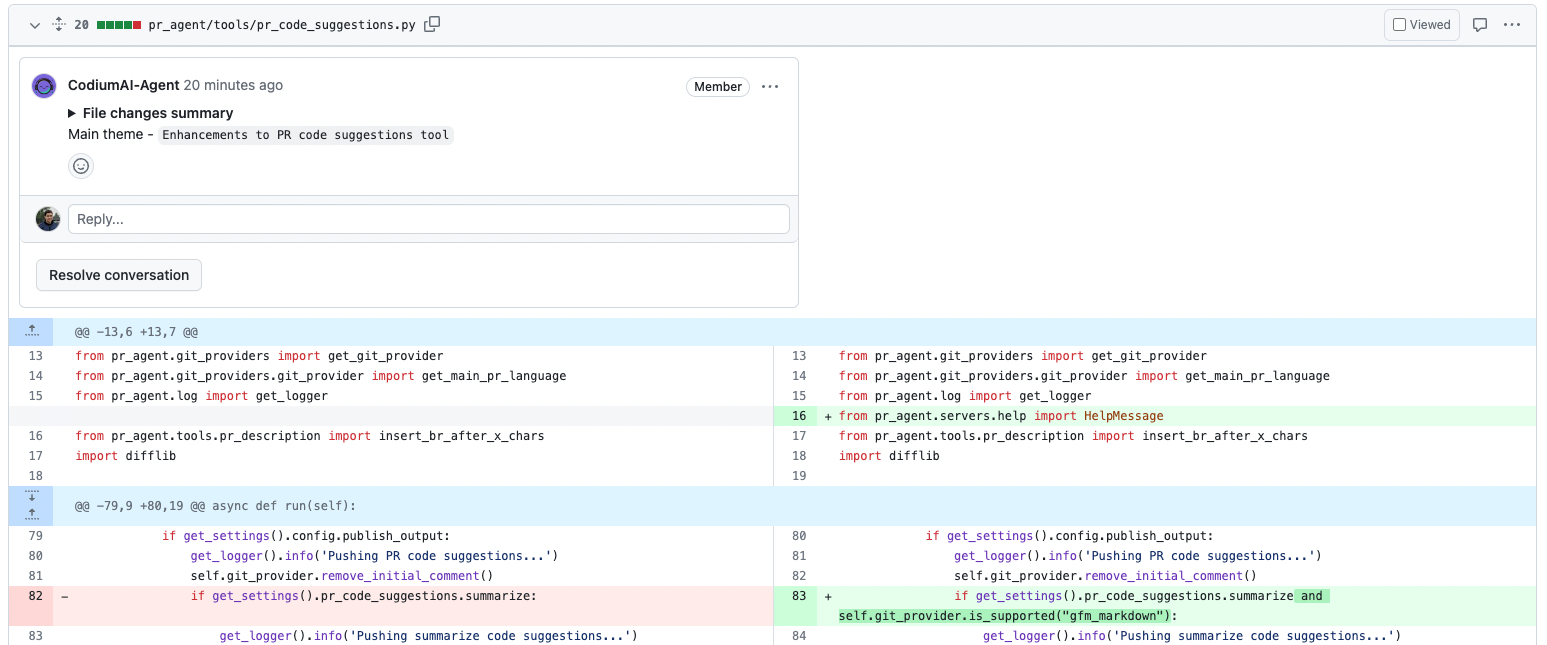
This feature enables you to copy the changes walkthrough table to the "Files changed" tab, so you can quickly understand the changes in each file while reviewing the code changes (diff view).
To copy the changes walkthrough table to the "Files changed" tab, you can click on the checkbox that appears PR Description status message below the main PR Description:
If you prefer to have the file summaries appear in the "Files changed" tab on every PR, change the pr_description.inline_file_summary parameter in the configuration file, possible values are:
'table': File changes walkthrough table will be displayed on the top of the "Files changed" tab, in addition to the "Conversation" tab.
true: A collapsable file comment with changes title and a changes summary for each file in the PR.
false(default): File changes walkthrough will be added only to the "Conversation" tab.
Note: that this feature is currently available only for GitHub.
Markers template
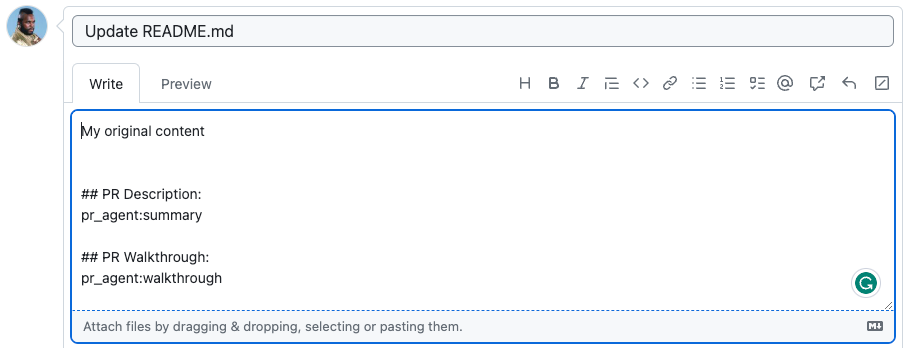
To enable markers, set pr_description.use_description_markers=true.
Markers enable to easily integrate user's content and auto-generated content, with a template-like mechanism.
For example, if the PR original description was:
User content...

## PR Type:
pr_agent:type

## PR Description:
pr_agent:summary

## PR Walkthrough:
pr_agent:walkthrough
pr_agent:type will be replaced with the PR type, pr_agent:summary will be replaced with the PR summary, and pr_agent:walkthrough will be replaced with the PR walkthrough.
→

Configuration params:
use_description_markers: if set to true, the tool will use markers template. It replaces every marker of the formpr_agent:marker_namewith the relevant content. Default is false.include_generated_by_header: if set to true, the tool will add a dedicated header: 'Generated by PR Agent at ...' to any automatic content. Default is true.
Custom labels
The default labels of the describe tool are quite generic, since they are meant to be used in any repo: [Bug fix, Tests, Enhancement, Documentation, Other].
You can define custom labels that are relevant for your repo and use cases. Custom labels can be defined in a configuration file, or directly in the repo's labels page.
Examples for custom labels:
Main topic:performance- pr_agent:The main topic of this PR is performanceNew endpoint- pr_agent:A new endpoint was added in this PRSQL query- pr_agent:A new SQL query was added in this PRDockerfile changes- pr_agent:The PR contains changes in the Dockerfile- ...
The list above is eclectic, and aims to give an idea of different possibilities. Define custom labels that are relevant for your repo and use cases.
Note that Labels are not mutually exclusive, so you can add multiple label categories.
Make sure to provide proper title, and a detailed and well-phrased description for each label, so the tool will know when to suggest it.
Each label description should be a conditional statement, that indicates if to add the label to the PR or not, according to the PR content.
Handle custom labels from the Repo's labels page 💎
You can control the custom labels that will be suggested by the describe tool, from the repo's labels page:
- GitHub : go to
https://github.com/{owner}/{repo}/labels(or click on the "Labels" tab in the issues or PRs page) - GitLab : go to
https://gitlab.com/{owner}/{repo}/-/labels(or click on "Manage" -> "Labels" on the left menu)
Now add/edit the custom labels. they should be formatted as follows:
- Label name: The name of the custom label.
- Description: Start the description of with prefix
pr_agent:, for example:pr_agent: Description of when AI should suggest this label.
The description should be comprehensive and detailed, indicating when to add the desired label. For example:

Usage Tips
Automation
- When you first install PR-Agent app, the default mode for the describe tool is:
meaning the
describetool will run automatically on every PR, with the default configurations.
-
Markers are an alternative way to control the generated description, to give maximal control to the user. If you set:
the tool will replace every marker of the formpr_agent:marker_namein the PR description with the relevant content, wheremarker_nameis one of the following: *type: the PR type. *summary: the PR summary. *walkthrough: the PR walkthrough. -
Note that when markers are enabled, if the original PR description does not contain any markers, the tool will not alter the description at all.